So this was my first try, and I think it came out great. I just forgot to put a top coat on and it ended up chipping the next day. I included a pretty in-depth tutorial. Keep in mind: this manicure is SO EASY! It probably takes 15 minutes from start to finish. It also helps because messing up is non-existent with this fun take on marbling.
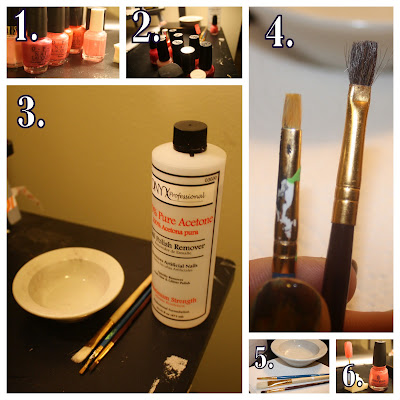
1 & 2. I figured I don't too much with pink so I thought it would be fun to use a bunch of my pinks. The idea originally came about after seeing this picture of a breast cancer survivor.
Her stomach says, "I had breast cancer and now I have Theo" in Portuguese.
Such a strong and amazing and brave and inspirational women.
3 4 & 5.. Anyways! All you will need is 100% acetone, a paper towel or 4, a small container for the acetone, as many polishes as you'd like, and then one or two smaller paint brushes that are somewhat soft. With the paintbrushes, they don't have to be for nails. I used some I had around from painting on canvas and they work just great.
6.Paint your nails with a base coat for protection, you should always do that, and a base color. Again, you can use any color you want. Try a few out and see what you like best!
7 & 8 & 9. Get ready to paint the other colors on. Get 80% of the polish off of the brush before you start painting. Just try to rough it up a little bit!
10 & 11. See the texture!? Actually you probably can't, damn it! Sorry!
12. Just another shot of a new color I used. .
13 & 14 & 15. I added white just to mix things up and it worked really nicely!
16 & 17. Using very light and gentle! I messed my pink one up as you can see!
18 & 19. Done! With a top coat and everything!
Remember you need 100% Acetone, finger nail polish will not recreate the same effect. I got a 16 oz bottle for $1.37 at Wal-Mart. It is worth it!
Reminder with acetone: It is crazy strong! And flammable! Do this in a well ventilated area and far away from flames. Just because you hate the smell of it and you decide to light a candle to get rid of the smell doesn't mean that catching your living area on fire is worth it! Opening windows or doors will get rid of it much faster anyways.
Also, don't forget to screw the cap back on tight, this stuff evaporates SO quickly!
I numbered these so that I can kind of just give you the tips I found during the process.
1. So I painted my nails with a base color. You can get really creative with this one. Just remember, the darker you go the more opaque colors you will probably have to end up using on top of those darker shades. Of course you can always layer dark in there and use to acetone to uncover it, or even put it on top of light or neon colors to revel them.
2, 3, & 4. Start stacking colors in whatever order you want! The best part of this is how creative it allows you to be. And messing up is non existent here!
*Also, I was an idiot and now can't remember the exact colors I used! I was really disorganized, but for some strange reason I had put these colors aside and must have thought I was at least organizing something. Then I decided I needed to organize to function normally, and messed up the grouping! Whoops!
So like I said above, my black one chipped and I figured I kind of wanted to do one that would be much brighter. I achieved that. And I have gotten so many complements on them!
For colors I used:
I used the colors above for this technique which I did second after getting the hang of the first try above!
Using the picture on the top right of the polishes as a reference: L to R I used
Sally Hansen White On
Sally Hansen Mint Sorbet (Which I used as my base color)
China Glaze Mom's Chiffon
OPI Samoan Sand
OPI Fiercely Fiona
OPI Dating a Royal
OPI In My Back Pocket
Sinful Colors Paradise


No comments:
Post a Comment